Tuesday, August 7, 2018

Update after being gone for a year and Newest Trends in Cardmaking!

Since my daughter turned about 6 months old I haven't crafted. At first I was sad because it's something I really enjoy and a nice relaxing way to release my creative desires. However, motherhood is an entirely new and exciting endeavor for me and I have embraced it entirely. My days that used to involve catering to my own needs and desires are now spent fulfilling the needs of my toddler. That being said, now that she's almost 2 years old I can get away with doing a few more things for myself. I haven't been able to film a video or even get a crafting session in yet but I've been able to color with her and at least use my supplies!

 That being said I checked in on what the latest trends are and wanted to make a list of what I have noticed has changed while I wasn't looking!

 Let's start with one of my personal favorite innovative artists - Tim Holtz!

 Tim Holtz has repeatedly disrupted the crafting scene with his out of the box ideas for new products. Whatever he creates the entire crafting community usually builds off of and it sets the tone for the newest trends. A quick peek at his website shows he hasn't slowed down one bit on his innovations. One of his newest products has me chomping at the bit!
 When I first started crafting years ago I went out and bought a ton of the adirondack alcohol inks and then sat there saying "Well, dripping these on glossy cardstock is fun and all, but what do I do with these now?" This new product is the answer!
 Alcohol Lift Ink works with stamps to lift the alcohol ink off of a porous surface and transfer it to a non-porous surface. I think of this as making a custom palette on Yupo and having endless ink combinations and beautiful rainbows to stamp! It makes me excited again to own tons of alcohol inks! I think that is just what Tim was hoping when he came up with these new products. In addition to stamping beautiful images with multiple colors, you are left with the ghost image of the stamp on the Yupo paper and you can make a card using that.

 This is my favorite image from his blog post about these products:


BOTH of these images would make an amazing card base or even a card and just add a black or white stamped sentiment. Gorgeous!

He also shows that you can use the new Alchol Lift Ink with an ink blender and a stencil. I LOVE stencils and even used to make my own. I highly recommend working on a glass surface with alcohol inks, especially when stenciling, since it makes clean up MUCH easier.

You can see his blog post and a video using the products here, http://timholtz.com/new-alcohol-ink-products/ . To avoid this blog post from being overly long I will spotlight another product in my next post. I hope you're as excited as I am!

If you want to purchase any of  these products I have included some links in the text and below. I will get a little commission, that doesn't increase the price of the products, as a thanks from you!


Monday, June 26, 2017

Craft News: Tim Holtz Releases 12 NEW Distress Oxide Colors!

That's right. We've all been anxiously awaiting more of these beauties to be released and now they're here!

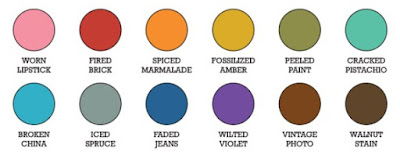
The 12 new colors are :


Tim Holtz Distress Oxide Inks are manufactured by Ranger Industries in New Jersey in the United States.

In a press release e-mail sent just a few hours ago Ranger said, " Introducing 12 new colors of Tim Holtz Distress® Oxide Ink Pads, a water-reactive dye & pigment ink fusion that creates an oxidized effect when sprayed with water. Use with stamps, stencils and direct to surface. Blend using Ink Blending Tools and Foam. All oxide colors are available in 3" x 3" ink pads and coordinating .5 oz re-inkers.".

The first 12 colors of Distress Oxide Inks were released earlier this year at Creativation. Creativation ,formerly known as the CHA Mega Show, is the creative industries largest trade show that happens once a year in January. Since Creativation was moved to Phoenix last year I had the opportunity to finally attend. I saw these inks in person and knew they would be a hit. Retailers have been having a hard time keeping them on their shelves. 

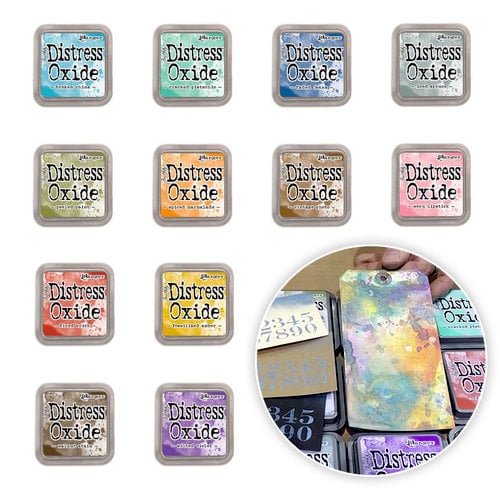
The 12 colors that were released in January: 


This is a nice start for a palette of colors. The Distress Ink palette consists of 61 colors (including white) so we can only speculate that eventually we will get all of the Distress Ink colors in Distress Oxide Ink form. 

Distress Inks and Distress Oxide Inks come in a 3 x 3" ink pad and retail for $5.99 each. Distress Inks are also offered in a mini cube form. We can only hope that Distress Oxides will eventually be released in this space saving option. Currently the white Distress Ink is not offered in the mini cube form. This can lead to speculation that maybe a formula such as distress oxide inks does not keep well on a smaller ink pad. I won't be holding my breathe that the Distress Oxides may be released in a smaller 1 x 1 " size. 

3 x 3 " cube: 


1 x 1 " Mini Cube: 

Want to get your hands on some Distress Oxide Inks? Here's some links! 


Ranger Ink - Tim Holtz - Distress Oxides Ink Pad Kit - Complete 2017 Bundle - $61.19

Retail Price: $72.00
You Save: $10.81
from: Scrapbook.com


Tim Holtz Distress OXIDE INK PAD SET OF 12 Ranger RANGER97 - $71.99

from: Simon Says Stamp


What is your favorite current Distress Oxide Color? I just find all of the blues so dreamy but I think I would have to pick Cracked Pistachio. I can't wait for them to bring out Mermaid Lagoon!


* Affiliate Links are used at no cost to you. They get me a small commission if you do purchase something using this link. It does not cost you anything. It is your way of saying "thanks for the suggestion". It helps support my hobby and will help me to bring more content to the blog and my youtube channel, IntoxicatingArts. Thank you!

Wednesday, March 8, 2017

Which Tool to Use for Precision Stamping Cling, Clear, Unmounted and Wood Block Stamps?

I recently got a Hampton Arts Stamp Perfect Tool and I love it! You may have seen my previous post where I mention how expensive the MISTI Tool is and how I made my own DIY version. Well, stamp companies have caught on and now there's plenty of competitors offering lower cost options. However, you may not always want to use one of these tools while you are stamping and I will tell you why.

Cling Mounted Stamps: 

These can be tricky because you can't see through them and they are not always cut very close to the stamp. The best way to get absolutely precise stamping with these is with a hinged letterpress style stamp positioning tool (listed at the bottom of the post) AND a piece of acetate.

First, you need to remove the foam layer from the stamping tool since the cling stamps are usually much thicker than clear stamps. Then add your piece of paper and tape down or use magnets if your tool allows. Then place your stamp in approximately the place you will want to stamp it and pick it up with the lid. Now put your piece of acetate on top of the paper. Tape it to create a hinge where you are still able to move the paper underneath. Ink up the stamp and stamp onto the plastic. Lift the lid and see if it has stamped where you want. If it hasn't then move the paper underneath until the image lines up where you want. Now all you have to do is take the plastic sheet out and ink up the stamp again and stamp it perfectly where you wanted. I use the Little B perfect positioner sheet for this since it has a helpful grid. Sometimes I use the plastic sheet that came with my stamp-a-ma-jig tool.

Clear Stamps: 

A lot of times you can get away with using just an acrylic block with clear stamps. I've been able to get some pretty precise stamping done with one. However, when you have a sentiment that you would like to be perfectly straight it can be very hard to do with just a block. In this case you will do something similar as above but with less steps (if you want ultra precise stamping then do exactly as above except leave the foam pad in the tool).

First, add your piece of paper and tape down or use magnets if your tool allows. Now put a plastic grid sheet over the paper to give you a guide to have a straight line. You can also use this to find the center if you are stamping a different image and want it perfectly centered. Put your stamp on the grid sheet where you want it and close the lid to pick it up. Then open the lid, remove the grid sheet and ink up the stamp. Close the lid to stamp and it will be in the perfect spot!

Unmounted Stamps:

These are really flat red rubber stamps that you may have bought at a rubber stamp show or really cheap on e-bay. I'm talking about stamps that don't even have a foam cushion of any kind. The best way I have found to stamp these in the right spot is with the Stamp-a-ma-jig and a square acrylic block. The stamp-a-ma-jig was made for use with wood stamps but you can certainly use it this way. There's a video on Amazon that shows how to use it, I recommend using blocks without the etched guides for this technique since we don't want adhesive getting stuck in the lines. These one's are smooth and have no lines. You can actually dedicate an acrylic block for use with your unmounted stamps and add a piece of Tack N Peel to it if you desire. The other option is adding Aleene's Tack it Over and Over  to the back of the stamp. You will want to let this "dry" and then stick it onto your acrylic block. I say "dry" because this interesting glue is sticky when dry and that's why you can tack it over and over. You can wash it off the stamp when you are done or find a place to store it where it won't stick to something. (Extra Bonus! I use this glue to make my own glue dots!).

Another option is simply turning these into Cling mount stamps by attaching them to some EZ Mount Cling Foam. 

Wood Block Stamps:

To date the best tool I've found for these is the Stamp-a-ma-jig. However, there's a new tool called the Position It Tool and it's a leterpress style stamping tool that allows the use of woodblock stamps! Pretty Impressive.

Here are your options for letterpress style Stamp Positioning Tools:


RESERVE Tim Holtz Tonic Craft STAMP PLATFORM 1708E - $39.99

from: Simon Says Stamp

I hope this has helped you in some way. If you need more information on the stamping tools, please leave a comment and I will be happy to help! 

Thursday, February 16, 2017

Best Paper for Smooth Watercolor isn't even Watercolor Paper!

Yes, you read that correctly!

Bristol Paper creates some amazing SMOOTH watercolor effects. 


Bristol Smooth Surface Paper by Strathmore is not traditionally used for watercoloring. In fact, it is meant for pencil and ink.

It is acid free and heavyweight at a 100 lb. weight. This makes it PERFECT for using on cards, mixed media and scrapbooking. 

Why should you use this paper? 
Well, it is the best paper for someone who is starting out and feels a little intimidated by watercoloring. I like using it because I don't do shading, highlighting or blending. I simply want some even color on my image. I generally use this on an image that I have stamped with memento tuxedo black ink.  Unlike watercolor paper, which will soak in some color initially, this paper tends to allow the color to float for a little bit before seeping in.

What types of watercolors work well on this paper?
I specifically wanted to try this paper with my Zig Clean Color Real Brush Markers. I was very pleased with the results. It also worked incredibly well with my Tim Holtz Distress Markers and Staedler Ergosoft Watercolor Pencils.

What if I am more advanced?
Since I am a novice at watercolor I can only recommend what I've seen other professionals recommend. If you want to do "proper" watercolor techniques then you may want to try Arches Cold Press Watercolor Paper or Canson XL Watercolor Paper. I have used Canson XL before and experienced no pilling even with heavy saturation and a lot of  brush strokes.

If you have been struggling with watercoloring for cardmaking, this just may be your answer. Remember, your surface is just as important as your medium. The same watercolor can look terrible on one paper and beautiful on another!


Thursday, June 9, 2016

Pebeo Fantasy Moon Discovery Kit Review

The Pebeo Fantasy Moon paints caught my eye because they are so glossy and have such an interesting effect.

The discovery set that I purchased includes 6 different colors. They are Turquoise, Veil of Smoke (grey), Carmine (red), Metal Blue (dark cool blue), Apricot and Gold. 

The back of the packaging briefly explains how to use these paints and what the consumer can expect. It states that it is " Solvent based effect colours which can be mixed together. Opaque, textured and pearl finish. Easy brush application in thin or thick layers. Immediate effect. Can be applied on all surfaces. Used with freshly painted Vitrail colours, marbled effects can be obtained. Mix well before use." 
Here's what the colors look like outside of the packaging: 
They are so beautiful! I love how iridescent they are. 

I took the cap off the top of one of them and took a picture of the inside of the bottle. 
It already has a textured look to it just sitting in the jar. I pulled out a brush and just used what was on the cap to do some swatch tests on a piece of 140lb watercolor cardstock. First I did a thin layer and then a thick layer. 

The thicker layer is the top of each labeled color. The thinner layer is on the bottom. If you go too thin then you won't get the cool hammered effect. I had trouble with the color Carmine for some reason. I may have needed to shake up the bottle more. I got it to do the effect a little bit when I went back in with a thicker coat. It's there but it's not showing up very well in the picture. 

For the most part I was super pleased with how instantaneous the effect was and how rich and shiny these paints are. They dry pretty quickly to a beautiful glossy coat. There is definitely a chemical smell to them since these are solvent paints. I didn't find it too strong but you don't want to be putting your nose in the jar. Also I noticed that the paints are very sticky. I had to really scrub my brush to clean it between colors. These dry to almost a varnish type of finish and they get very hard. I tested it out on watercolor paper but these will also work on non pourous surfaces such as the Pebeo Liquid Art Panel shown below. 


This panel has a raised edge on a gessoed surface. It makes it so you can pour your medium on it and not worry about it running off the sides. I purchased these paints to use for small accent areas on a much larger canvas that I will be working on soon. It's actually 4 canvases that will make one image. These paints will add a lot of interest to a few areas. One reason I would never use these as more than an accent paint is the cost. I purchased these 20 ml bottles in a 6 pack for $19.99. That breaks down to $3.33 per 20 ml. That's a bit on the high end if you plan to use these paints for large areas. They are sold in larger jars as well and that may or may not be more economical. I have not done the math on it. Another idea I have is to use these in my card making. I can totally see painting these on a flower or other stamped image for some major wow factor!

I hope you enjoyed my review of the Pebeo Fantasy Moon Discovery Kit. I definitely recommend getting a set of these if you are looking to add something that makes an interesting effect to your stash of paints. There's also a slightly more expensive set that comes with other types of effect paints. It's called the Mixed Media Discovery Collection.  For about $30.00 you get twelve 20ml paints.

If you have any questions or want me to review something, please leave a comment below. Thank you!

Thursday, May 19, 2016

Review and Techniques with Prima Water Soluble Oil Pastels


I recently ordered some Prima items and among them were the Water Soluble Oil Pastels. Since one of the boxes came dented up I decided I would keep that one for myself (since the contents were likely damaged- and they were) and write a review about it. 

These pastels come in a box of 24 and retail for $20.00. Simon Says Stamp sells them. We also sell them but by the time this blog post goes up we'll probably only have a couple left

Once I opened my box I got right to work seeing what these worked well for and maybe not so well for. 

First technique was general coloring. The pastels are very creamy and would even draw on the tip of my finger. I tried scribbling on a thin sheet of non primed paper and it easily took the pastel. I added some water with my paint brush and it easily made the numbers I had written disappear. They are very soluble even on a non primed surface. 

Second technique was mixing with a gel medium. I chopped off the end of one of the pastels with my palette knife and smashed it into some Prima 3D Gloss Gel Medium . It's not as creamy as a gelato so it took quite a bit of smashing to get it mixed in. I used the red color and you can see the result of me applying it through a star stencil on the picture below on the right. 

On the left side of the picture you will notice some light green dots over a purple wash of color. The purple wash of color was added on top of some dried Prima 3D Gloss Gel to see how it would react. I wanted to see if the water soluble oil pastels would stay on that medium or if it would act as a resist. It dried and stayed on it just fine. Then I was able to scribble the oil pastel on a non porous surface and mix in some Liquitex Gloss Gel Medium to create another colorful mixture to put through a stencil. This blended much easier than chopping off the end of a pastel. 

For my next technique I thought it would be fun to see how they worked on enhancing texture. I added some Golden Molding Paste to my journal and dried it with a heat tool to create some bubbles and get a lunar type of texture. Then I lightly scribbled on top of the texture, squirted some water on it, and blended it out with my finger. Here's the effect: 
It really gets into all of those small nooks and crannies and really accentuates the texture! 

Next I wanted to see how these worked for stamping. This one of my favorite techniques with these pastels and it's enough to make me happy to own them! All you do is scribble on the back of a stamp and give it a few mists of water and stamp down. You can then use a waterbrush to draw some of the color from the edges to the inside or even grab color directly from the oil pastel to add to your image. Here's how it came out on 140 lb watercolor cardstock using a photopolymer stamp: 

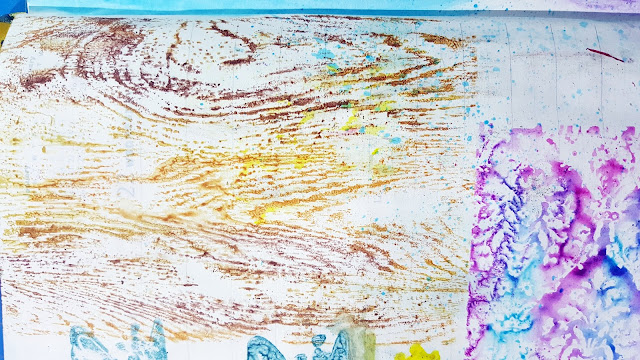
Lastly I tried it on a rubber stamp with 3 different colors to see what would happen and that came out nice too. Here's what that looked like with a woodgrain stamp: 

If you like these techniques then I definitely recommend checking out the Prima Water Soluble Oil Pastels

Prima Flowers ARTIST QUALITY OIL PASTEL CRAYONS 814328
Here's a video I put together showing all of these techniques in action! 

Friday, May 13, 2016

Best Tools for Getting a Perfect Stamped Image

In today's high tech world we have so many options to chose from even in the crafting world! Today I am going to run through some of the various options we crafters have to chose from to get a crisply stamped image. I'll briefly explain the best situations for each tool and why you may want more than just one of them depending on the type of stamp you have.

Standard Acrylic Block. 

This is the cheapest option but it can also be the most frustrating. Regular acrylic blocks are great for stamping images that you will be cutting out later or the placement is unimportant. They're also good if you are stamping something that you will be adding to your card. I do not recommend using a standard acrylic block to stamp something on a card base that you have put a lot of time into. The reason is because it can be easy to stamp the image poorly and it's hard to place your stamp directly back on top to re-stamp it. It's also hard to stamp sentiment stamps perfectly straight when you are basically eyeballing it. 
Apple Pie Memories makes some good acrylic blocks. There's have grooves in them that makes getting a grip easy. They also have a grid laser etched in them which makes lining up your stamp easier. 
Inkadinkado also makes a large one which is the one I own. 
Prima makes one that has a handle. Many people like that but I actually feel like that gives me less stability. 
If you get an acrylic block I highly recommend getting one with an etched grid and finger grooves. There's some cheap ones out there without these features and I feel that they are far less superior. 

Prima 4 x 8" block with handle $17.24: 

Apple Pie Memories 4 pack $18.68: 

Inkadinkado Extra Large Acrylic Block $11.94: 


Fiskars Stamp Press and Martha Stewart Stamp Mount

Both of these are offered in a smaller and larger size. 
You can use these as your one and only stamping block if you want but there's other ones I'll mention later that have benefits in certain situations. I personally own the larger Fiskars Stamp Press and I like it for sentiment stamping. Even with some of my other stamping tools, I still use it for stamping large sentiments on the inside of my cards. The benefit of these type of stamping blocks is the foam feet provide height and stability so you can line up your stamp perfectly over your paper and then press straight down when it's in the perfect position. This also makes it easier to get stamps really close together without overlap such as when you are stamping a garden of flowers. You can even put all of the stamps on the stamp press and get it done in one shot. The large surface area makes this possible.
Compact Stamp Press at Simon Says Stamp $13.99: 

Fiskars Compact STAMPING PRESS Stamp Entire Project at Once 02958
Large Stamp Press at Simon Says Stamp $22.99: ( This is the one I own and it's $14.07 on Amazon)

Fiskars Easy LARGE STAMPING PRESS Stamp Entire Project at Once 08849

Medium Martha Stewart Stamp Mount at Amazon $9.24:


Small Martha Stewart Stamp Mount at Amazon $5.72:


Stampamajig

Stamp a whaaa? Yeah it's a mouthful but this little tool is a major help with wood mounted stamps. This 2 piece set includes a plastic bar and a clear plastic sheet. All you do is put the corner of your wood stamp in the corner and stamp straight down onto the plastic sheet. Then you take the plastic sheet and put it on the area you want to stamp and place the plastic bar on the sheet. Now you remove the plastic sheet, ink up your stamp and stamp down exactly where you wanted to. This is the best tool for getting straight stamping with wood mounted stamps. 

Sold at Amazon for $7.19: 


• Crafter's Companion Rock a Block
The Rock a Block is supposed to make it easier to avoid smudging or over-stamping by stamping in one smooth motion. You roll the stamp from bottom to top. I haven't used these myself because I already have many ways to get a good stamped image, but if I didn't already own a ton of stamping tools I'd definitely give these a try. I may even buy them for my Mom since I think she'd enjoy them. 

Sold at Simon Says Stamp for $14.99 for a pack of 4: 

Crafter's Companion Set of 4 ROCK-A-BLOCKS Stamping System 762398

• MISTI & Stampaholic

These bad boys are new to the scene and they cost a pretty penny! 
Both of these tools use the letterpress technique to stamp clear or cling mounted stamps (just remove the foam when using cling). This unique system makes it incredibly easy to re-stamp perfectly. You can also lay down an entire scene and stamp it at once. Grid patterned paper and rare earth magnets to hold your paper in place make this a fool proof way to get straight stamping done. There is a metal plate on the back that the magnets are attracted to. You also get rulers around the outside for extra precision. 
The MISTI (stands for Most Incredible Stamping Tool Invented) comes in three different sizes depending on your application. The Mini MISTI is perfect for card makers. The original MISTI is larger and makes stamping directly on the inside of a card base possible. The Memory MISTI has a 12 x 12" stamping space which is perfect for Scrapbookers! The MISTI's range in price from $49.99 to $110.00. This is an investment in your stamping and not a cheap tool by any means. There's also one called the Stampoholic which is around the same size as the original MISTI and it's $54.95 which is about $25.00 less than the MISTI. However, there is a patent on the MISTI which the Stampoholic may be infringing on. I am not a patent lawyer so don't take my word on it. Patents are expensive and normally get built into the cost of an item to make some money back. Many people own the MISTI and are completely in love with it. It's extremely useful when you are stamping multi-step stamps such as Altenew's Vintage Roses. I am a little cheap and have spent more than my fair share on expensive crafting tools (Silhouette Cameo 2 and the MINC machine to name a few!), so I did it as a DIY which we'll talk about next! 
Mini MISTI for $49.99 at Simon Says Stamp:


MINI MISTI PRECISION STAMPER Stamping Tool Kit mistimini
Full Size MISTI for $79.99 at Simon Says Stamp :

MISTI PRECISION STAMPER Stamping Tool Kit
Memory MISTI for $110.00 at Simon Says Stamp:

RESERVE MISTI MEMORY MISTI PRECISION STAMPER 12.25x12.25 Stamping Tool Kit mistimem

• DIY Letterpress Style Stamping Tool 

I found this video on YouTube and thought "Wow, what a great idea!"

There was a link below the video to the store that carried all of the necessary supplies. I recently went on their website again and it appears they have everything but the metal sheets by Darice. 
Here's what you need: 
DVD case  $2.99( or you can get a 10 pack here and store your stamps in them too!) 
Rare Earth Magnets $2.49 x 2 = $4.98 (or get an 8 pk here for $5.08)
Little B Perfect Positioner $3.99 (or $2.79 here)
Craft Foam $0.69 ( or $7.49 for a 10 pk and use the left overs with adhesive as full back foam adhesive on cards!)
Metal Sheet $9.67 ( this is more than you need so find another project to use the rest!)

Total cost for the DIY stamping tool is $22.32 if you buy everything you can from Hallmark Scrapbook and the metal sheet from Amazon. The Darice metal sheet was smaller and less expensive so hopefully those come back in stock some time. I've used mine more than a handful of times now and I really like it. I especially like being able to double stamp when I'm working on watercolor paper. 

• Stamping Pad

A stamping pad can help you get a nicer image than stamping on a hard surface. It lets the stamp sink into something. You can use a cheap mousepad or fun foam for this but there are special stamping pads out there that are a little thicker. Darice makes a rubber one and it has great reviews. Obviously you won't need this when using your MISTI or DIY stamping tool. 


That covers it for the best tools to get a perfect stamped image. I hope I have enlightened you today and you learned something or found a new tool you didn't know existed that will make your stamping a little easier and more fun! If you have any questions, please leave me a comment and I will be happy to help you out!