Monday, June 26, 2017

Craft News: Tim Holtz Releases 12 NEW Distress Oxide Colors!

That's right. We've all been anxiously awaiting more of these beauties to be released and now they're here!

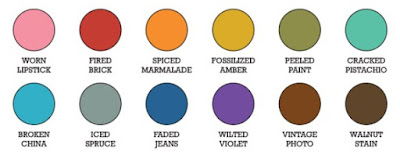
The 12 new colors are :


Tim Holtz Distress Oxide Inks are manufactured by Ranger Industries in New Jersey in the United States.

In a press release e-mail sent just a few hours ago Ranger said, " Introducing 12 new colors of Tim Holtz Distress® Oxide Ink Pads, a water-reactive dye & pigment ink fusion that creates an oxidized effect when sprayed with water. Use with stamps, stencils and direct to surface. Blend using Ink Blending Tools and Foam. All oxide colors are available in 3" x 3" ink pads and coordinating .5 oz re-inkers.".

The first 12 colors of Distress Oxide Inks were released earlier this year at Creativation. Creativation ,formerly known as the CHA Mega Show, is the creative industries largest trade show that happens once a year in January. Since Creativation was moved to Phoenix last year I had the opportunity to finally attend. I saw these inks in person and knew they would be a hit. Retailers have been having a hard time keeping them on their shelves. 

The 12 colors that were released in January: 


This is a nice start for a palette of colors. The Distress Ink palette consists of 61 colors (including white) so we can only speculate that eventually we will get all of the Distress Ink colors in Distress Oxide Ink form. 

Distress Inks and Distress Oxide Inks come in a 3 x 3" ink pad and retail for $5.99 each. Distress Inks are also offered in a mini cube form. We can only hope that Distress Oxides will eventually be released in this space saving option. Currently the white Distress Ink is not offered in the mini cube form. This can lead to speculation that maybe a formula such as distress oxide inks does not keep well on a smaller ink pad. I won't be holding my breathe that the Distress Oxides may be released in a smaller 1 x 1 " size. 

3 x 3 " cube: 


1 x 1 " Mini Cube: 

Want to get your hands on some Distress Oxide Inks? Here's some links! 
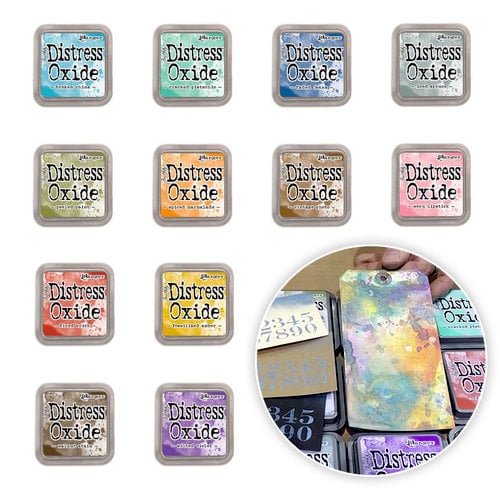


Ranger Ink - Tim Holtz - Distress Oxides Ink Pad Kit - Complete 2017 Bundle - $61.19

Retail Price: $72.00
You Save: $10.81
from: Scrapbook.com


Tim Holtz Distress OXIDE INK PAD SET OF 12 Ranger RANGER97 - $71.99

from: Simon Says Stamp


What is your favorite current Distress Oxide Color? I just find all of the blues so dreamy but I think I would have to pick Cracked Pistachio. I can't wait for them to bring out Mermaid Lagoon!


* Affiliate Links are used at no cost to you. They get me a small commission if you do purchase something using this link. It does not cost you anything. It is your way of saying "thanks for the suggestion". It helps support my hobby and will help me to bring more content to the blog and my youtube channel, IntoxicatingArts. Thank you!

Wednesday, March 8, 2017

Which Tool to Use for Precision Stamping Cling, Clear, Unmounted and Wood Block Stamps?

I recently got a Hampton Arts Stamp Perfect Tool and I love it! You may have seen my previous post where I mention how expensive the MISTI Tool is and how I made my own DIY version. Well, stamp companies have caught on and now there's plenty of competitors offering lower cost options. However, you may not always want to use one of these tools while you are stamping and I will tell you why.

Cling Mounted Stamps: 

These can be tricky because you can't see through them and they are not always cut very close to the stamp. The best way to get absolutely precise stamping with these is with a hinged letterpress style stamp positioning tool (listed at the bottom of the post) AND a piece of acetate.

First, you need to remove the foam layer from the stamping tool since the cling stamps are usually much thicker than clear stamps. Then add your piece of paper and tape down or use magnets if your tool allows. Then place your stamp in approximately the place you will want to stamp it and pick it up with the lid. Now put your piece of acetate on top of the paper. Tape it to create a hinge where you are still able to move the paper underneath. Ink up the stamp and stamp onto the plastic. Lift the lid and see if it has stamped where you want. If it hasn't then move the paper underneath until the image lines up where you want. Now all you have to do is take the plastic sheet out and ink up the stamp again and stamp it perfectly where you wanted. I use the Little B perfect positioner sheet for this since it has a helpful grid. Sometimes I use the plastic sheet that came with my stamp-a-ma-jig tool.

Clear Stamps: 

A lot of times you can get away with using just an acrylic block with clear stamps. I've been able to get some pretty precise stamping done with one. However, when you have a sentiment that you would like to be perfectly straight it can be very hard to do with just a block. In this case you will do something similar as above but with less steps (if you want ultra precise stamping then do exactly as above except leave the foam pad in the tool).

First, add your piece of paper and tape down or use magnets if your tool allows. Now put a plastic grid sheet over the paper to give you a guide to have a straight line. You can also use this to find the center if you are stamping a different image and want it perfectly centered. Put your stamp on the grid sheet where you want it and close the lid to pick it up. Then open the lid, remove the grid sheet and ink up the stamp. Close the lid to stamp and it will be in the perfect spot!

Unmounted Stamps:

These are really flat red rubber stamps that you may have bought at a rubber stamp show or really cheap on e-bay. I'm talking about stamps that don't even have a foam cushion of any kind. The best way I have found to stamp these in the right spot is with the Stamp-a-ma-jig and a square acrylic block. The stamp-a-ma-jig was made for use with wood stamps but you can certainly use it this way. There's a video on Amazon that shows how to use it, I recommend using blocks without the etched guides for this technique since we don't want adhesive getting stuck in the lines. These one's are smooth and have no lines. You can actually dedicate an acrylic block for use with your unmounted stamps and add a piece of Tack N Peel to it if you desire. The other option is adding Aleene's Tack it Over and Over  to the back of the stamp. You will want to let this "dry" and then stick it onto your acrylic block. I say "dry" because this interesting glue is sticky when dry and that's why you can tack it over and over. You can wash it off the stamp when you are done or find a place to store it where it won't stick to something. (Extra Bonus! I use this glue to make my own glue dots!).

Another option is simply turning these into Cling mount stamps by attaching them to some EZ Mount Cling Foam. 

Wood Block Stamps:

To date the best tool I've found for these is the Stamp-a-ma-jig. However, there's a new tool called the Position It Tool and it's a leterpress style stamping tool that allows the use of woodblock stamps! Pretty Impressive.

Here are your options for letterpress style Stamp Positioning Tools:


RESERVE Tim Holtz Tonic Craft STAMP PLATFORM 1708E - $39.99

from: Simon Says Stamp

I hope this has helped you in some way. If you need more information on the stamping tools, please leave a comment and I will be happy to help! 

Thursday, February 16, 2017

Best Paper for Smooth Watercolor isn't even Watercolor Paper!

Yes, you read that correctly!

Bristol Paper creates some amazing SMOOTH watercolor effects. 


Bristol Smooth Surface Paper by Strathmore is not traditionally used for watercoloring. In fact, it is meant for pencil and ink.

It is acid free and heavyweight at a 100 lb. weight. This makes it PERFECT for using on cards, mixed media and scrapbooking. 

Why should you use this paper? 
Well, it is the best paper for someone who is starting out and feels a little intimidated by watercoloring. I like using it because I don't do shading, highlighting or blending. I simply want some even color on my image. I generally use this on an image that I have stamped with memento tuxedo black ink.  Unlike watercolor paper, which will soak in some color initially, this paper tends to allow the color to float for a little bit before seeping in.

What types of watercolors work well on this paper?
I specifically wanted to try this paper with my Zig Clean Color Real Brush Markers. I was very pleased with the results. It also worked incredibly well with my Tim Holtz Distress Markers and Staedler Ergosoft Watercolor Pencils.

What if I am more advanced?
Since I am a novice at watercolor I can only recommend what I've seen other professionals recommend. If you want to do "proper" watercolor techniques then you may want to try Arches Cold Press Watercolor Paper or Canson XL Watercolor Paper. I have used Canson XL before and experienced no pilling even with heavy saturation and a lot of  brush strokes.

If you have been struggling with watercoloring for cardmaking, this just may be your answer. Remember, your surface is just as important as your medium. The same watercolor can look terrible on one paper and beautiful on another!